Windows
Windows setup
Currently setup was tested on computers running Windows 10 Pro but other versions of Windows 10 and 11 should work as well.
Installing the required programs
Setting up digirig
For digirig to interface with Windows, we need a combined driver (serial and audio):
- Download and Install CP210x_Universal_Windows_Driver from here
For our modem, we will be using Vara. On this topic, you can use the free version of Vara but the paid version is recommended due to the increase in speed.
Rename the default digirig sound
Procedure:
-
Open
Control Paneland then click onSound.
Set the Playback device
-
Right click on the
USB PnP Sound Deviceand then click onSet as Default Communication Device
-
Select any other audio device and set it as the
Default Device. This is needed otherwise Windows will use the digirig as its default audio device.
-
Rename the USB PnP Sound Device by right clicking on it and then on
Properties
-
Change the name of this device to
Digirig
-
Click on
Levelsand change theSpeakersto 25 -
Click on
Ok
Set the Recording device
-
Click on
Recordingand then follow the same procedure on changing the name of the device as illustrated on thePlayback. Make sure the digirig is marked as theDefault Communications Device. -
Right click on the
USB PnP Sound Deviceand then click onSet as Default Communication Device
-
Select any other audio device and set it as the
Default Device. This is needed otherwise Windows will use the digirig as its default audio device.
-
Rename the USB PnP Sound Device by right clicking on it and then on
Properties
-
Change the name of this device to
Digirig
-
Next, click on
Listenand then check theListen through this device. Also select theContinue running when on battery power
[!NOTE]
The reason we are enabling
Listen through this deviceis that this will pipe the incoming audio from our Vara session into the default audio device, which allow us to troubleshoot the session or to have an idea of wether or not this is working. It isn't stricly needed for Vara to operate but it is a nice add-on.
-
Click on
Customand disableAGC
-
Click on
Levelsand set it to 25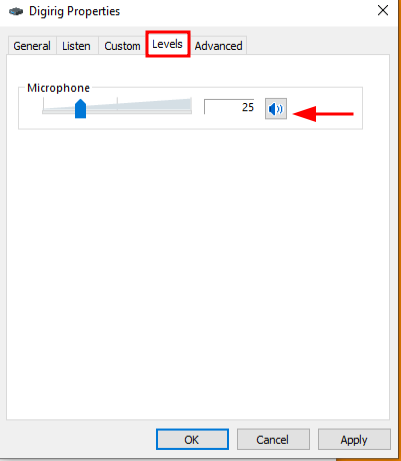
-
Click on
Ok
Setting up Vara and rigctld
-
Download and install Vara from here.
[!NOTE]
In here you could opt to have a dedicated Vara "modem headless machine" with either Vara FM, Vara HF or both.
To control our radio (FT818nd), we will be using rigctld. This will allow for CAT control when using RadioMail on iOS:
- Install
rigctld, available as part of thehamliblibrary here. Unzip this underC:\hamlibas we will be referencing this directory later in this doc.
[!NOTE] OPTIONAL STEPS:
Optionally, you could install the Winlink Express client on this machine and use it either localy or through Remote Desktop.
Adding automation
After installing these softwares, we will now move into adding a few configurations that will allow the machine to work as a headless modem.
Adding an adhoc network
The Macbook Air that I used for this project uses an Intel wireless interface that support hostednetwork by default. This is important since we will be creating a wireless hotspot that we can use to connect our iOS devices and use RadioMail. You can either use the provided script (under scripts/start-hostspot) or create one manually - make sure you edit this to your like, for instance, change the ssid and key.
Here is the start-adhoc script:
# Start hostednetwork on Windows 10
REM Starting hostednetwork
netsh wlan set hostednetwork mode=allow ssid=VE6DPC-MODEM key=CHANGEME
netsh wlan start hostednetwork
Save this script under C:\MODEM
[!NOTE]
If running this script manually, you need to run it as administrator.
With this bat script in place, we can proceed by creating a Task to automate its run during the bootstraping process of Windows.
Procedure:
-
Open
Task Scheduler
-
Create a task with the following values
- Click on
Create Task - Give your task a Name.
- Under
Security optionschoose:Run whether user is logged on or notRun with highest privileges
- Under
Configured forchooseWindows 10

- Select the
Triggerstab and thenNew. Enable the following values:

- Under
Actionsclick onNew. Inside of theEdit Actionwindow selectAction: Start a programand then select the bat script that starts your adhoc network as showed here:

- Click on
OKto save your task.
- Click on
Adding a task for rigctld (FT-818nd only)
If you are using the FT818nd - or another radio that supports CAT from rigctld - then you could create a script and a task under the Windows Task Scheduler to launch rigctld. You will find an example of a working rigctld bat file in the scripts folder.
Here is start-rigctld bat script:
# Configuration for the FT817/FT818nd using digirig on COM3
REM Start rigctld
"C:\hamlib\bin"\rigctld.exe -m 1020 -s 38400 -r COM3 -v
Breaking down this command:
| flag | notes |
|---|---|
| -m | selects the radio model. In this example 1020 is the Yaesu FT-817/818 |
| -r | serial port connected to the radio. In this case COM3 |
| -s | serial port speed for CAT control. In this example 38400. This needs to be configured in the FT818nd on Menu item 14 |
| -v | verbose output. You can increase this to -vvvv to have more information on rigctld, which is very useful when configuring your radio. |
How do I find what COM port my dgirig is installed?
Open the Device Manager on Windows and then Ports (COM & LPT). Look under the Silicon Labs CP210x USB to UART Bridge device. The following is an example of this device configured under COM3

In the next steps we will create a task that will run rigctld automatic for us after the user logs into the PC.
Procedure:
-
Open
Task Scheduler -
Create a task with the following values
- Click on
Create Task - Give your task a Name.
- Under
Security optionschoose:Run whether user is logged on or notRun with highest privileges
- Under
Configured forchooseWindows 10

-
Select the
Triggerstab and thenNew. Enable the following values: -
Under
Actionsclick onNew. Inside of theEdit Actionwindow selectAction: Start a programand then select the bat script that starts your adhoc network as showed here: -
Click on
OKto save your task.
- Click on